Showing posts with label 3D project. Show all posts

Saturday, March 6, 2010

Butterfly Box

If you click on older posts down the bottom you will see the tutorial on how to make this simple but cute box.

I used my Crop-a-dile with the grid from the Mat Pack to dry emboss the dots.

Have a great weekend.

Donna

Saturday, January 30, 2010

Wedding Triangle Box

This Triangle box is very gorgeous and very easy to make.

1. Cut a sheet of A4 cardstock in half lengthways. It should be 28.8cm by 10.5cm (I used Real Red).
2. Using a scoring blade or your bone folder, score lines as above. (Ignore the holes, I forgot to take photos until I had already punched them).
3. Decorate as you please (this is the SO Swirly Wheel and the Eyelet Border Punch)

4. Fold along score lines.

5. Hold one one of the sides together and punch (I used my crop-a-dile, but you could use a hole punch). Do this on the other side and then thread the ribbon through).

Friday, January 29, 2010

Wedding Favour in Red and Black

At the beginning of the week I was asked to make a couple of wedding favours using Real Red, Basic Black and the So Swirly Stampin' Around Wheel.

Here is one sample that I made. It is a little dark against the background, but hopefully you get the idea.


Thursday, January 28, 2010

Buttons and Bags

I am keeping to a couple of themes with this box. Firstly, using a sample from the catalogue that I have altered to suit a stamp set and colour family that I already have. Secondly, to use the Pun Fun stamp set and the In-Colours and Neutrals range of card, buttons and ribbons.


I will be starting a new Stamp Club in March. Please contact me if you would like to find out more details. The box above is just one example of the projects that we will be making.

Thursday, November 12, 2009

The Embossing Queen

I think that if I had to choose my very favourite paper crafting technique, it would have to be heat embossing. It takes everything to such a different level. On this bag that I gave as a gift at Stamp Fest last Saturday, I covered the whole bag in Versamark. Sprinkled it with the clear emboss powder, then before heating it with the heat tool, I scratched all over with the bone folder to get a crocadile skin affect. Very funky!

I used the stunning Filigree brads for extra Wow!

Thursday, November 5, 2009

Add Christmas Cheer


Many of us like to give a bottle of wine as a gift at this time of the year. Why not make it extra special by decorating the bottle!
For the bottle wrap I have used the Scallop Edge Punch on Choc Chip card stock to create the 'frill'.
I used the Urban Garden Designer Series Paper as the 'wrap', but before I adhered it to the bottle I daubed the edges with Choc Chip ink.
For the label I used Choc Chip, Baja Breeze and Whisper White card stock and daubed choc Chip ink around the edge of each piece.
I used the Baja Breeze ink and clear emboss powder on the Fifth Avenue Floral stamp (the embossing looks fab! but it is a bit lost on this photo).
To finish off I threaded the White Taffeta ribbon through and threaded (with help with some cotton thread) on a bead from the Pretties Kit.
You may noice by the way that the bottle is empty! My husband was gutted when I nicked a bottle of good wine. Which is another point. If you have bought a nice bottle of wine write the wine information on the back of the label.
Have fun
Donna

Monday, November 2, 2009

Christmas Tree Decoration

This Christamas tree decoration was described to me over the phone by my wonderful upline Anela Corbett. She had used the scalloped punch for hers, but I would imagine that it would look good created using a whole variety of the punches.
I made mine using the curly label punch.
1. Punch eight shapes out of the Bella Bleu Designer Series Paper.


2. Score them using the bone folder and a ruler. Then fold them in half.
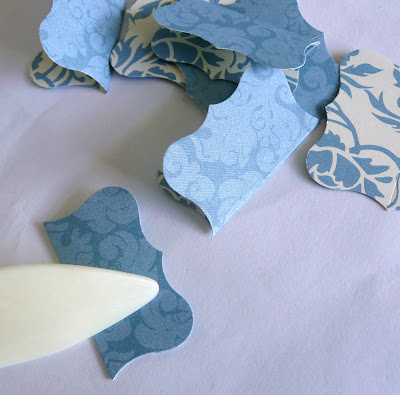
3. Adhere one half of a punchie to another using a 2-Way Glue Pen or a SNAIL adhesive. Do that on four of the punchies. (I forgot when I did mine so had to pull it apart hence the photo showing six punchies stuck together).


4. Place a piece of taffeta ribbon down the centre and then continue gluing down your punchies.

5.When you have stuck them all down make a loop at the top with the ribbon using a piece of matching thread to tie it. At the bottom thread a bead from the pretties kit onto the taffeta ribbon. I find it easier to tie a piece to thread to the ribbon first and pull that through the bead first. You need a bit of brute force, but it does work!

I hope that you have fun making this.

The Curly Label Punch Bundle is part of this months specials. If you purchase this or a variety of the other items on the Christmas Gift-Giving Guide and total is $105 or more than you will receive the Scalloped Square Punch for free. What a great Christmas Present.

Sunday, November 1, 2009

Just Beachy


I just love this box. I have made it quite a few times now. ( Check out my earlier posting for tutorial http://donnastamps.blogspot.com/2009/06/goodie-bag-wrap.html).
And the Just Beachy stamp set is fabulous set to decorate it. The expressions on the fishes faces are just classic. This would be a great present filled with small chocolate fish. The Just Beachy Stamp Set is on page 14 of the Spring Mini Catalogue and is great value at only $53.95.


You only have until the end of November to purchase anything from this catalogue, so contact me to place your order.

Friday, October 2, 2009

Stamp Fest Project 2 - Embossed Candle

The second Stamp Fest project I would like to tell you about is the Candle, Wrap and Tag project. At this table, you will be embossing on a candle, making gift wrap using our exclusive wheels and making tags using a range of stamp sets and punches.

Thank you to Carolyn for making this sample for the Stamp Fest. I think this is very stunning, then again anything made with this stamp set is amazing, don't you think!!

To purschase the Snow Swirled stamp set $53.95 or to book your place at Stamp Fest,contact me on 09 238 2100 of donnacalley@xtra.co.nz.

Donna


Stamp Fest Project - Scrap Gift Box.

I thought it was high time that I shared some of the projects that we are going to be making at Stamp Fest on the 7th November. This project is a Scrap Gift Box. This one is Angela's version. Man I can't wait to do my own. My Mum and Stepdad are coming over at the end of November. I can just imagine the look on her face when she opens the one I will make for her!
We have a lot of people interested in Stamp Fest this time around and spaces are limited, so secure your place by contacting me on 09 238 2100 or e-mail me donnacalley@xtra.co.nz.

Look forward to hearing from you.

Kind regards,

Donna

Friday, September 25, 2009

Wedding Box With A Twist


I love the Sour Cream Box. It is very quick, easy and stunning! It is basically a cylinder that is twisted in the middle. Check out http://www.splitcoaststampers.com/ for the tutorial. The white Baroque Motif design and the flowers are embossed. For the flowers I dipped a piece of black card stock into versamark then clear embossed it before punching with the Trio Flower Punch.
The white circles of the flower have a blob of Crystal Effects on it to give the 'brad' look.
Give me a shout if you need to stock up your craft cupboard.

Tuesday, September 22, 2009

Sour Cream Container


I love the sour cream container. It is so easy and is very stylish, especially in the Urban Garden designer series paper. If you would like to host a workshop where you and your friends can learn how to make one of these containers ring me on 09 238 2100

Friday, September 18, 2009

Krafty Wedding Invitation.


I absolutely adore the Kraft cardstock from Stampin'Up! and af course they have designer series paper to match. The paper that I have used here is the Bella Bleu series.
The ribbon I have used is the kraft taffeta, the stamp set is Please Come and I have also used the Jumbo Eyelets were set using the Crop-a-Dile.
My lovely team member Carolyn made the box for me. I love being a part of a team.
For more information about being a part of my team or about any other Stampin' Up! enquiry please contact me on 09 238 2100 or donnacalley@xtra.co.nz.
Kind regards
Donna

Monday, August 31, 2009

Beautiful, Bright Bride

Created by Donna Calley.

I have been wanting this lovely lady since April. Isn't she stunning! I have black embossed her and then coloured her in with Pixie Pink Stampin' Write. I then used a dauber to apply Pink Passion, this gives the nice blended colour. It also goes so great with the Raspberry Tart Designer Series Paper.
The Bride is holding a Rhinestone Brad and I have added the larger one over the top of the ribbon. Both the Pretties Kit and the packs of Rhinestone brads come with three sizes of brads, so you can choose the one that is in proportion to the project you are making.
The bag is a Double-Pocket Bag. It is really easy to make. Contact me today and either myself or one of my team can show you in a workshop or class.
Want more tips techniques and information? Then subscribe to my newsletter. The next one comes out tomorrow.
Have a great night.
Donna

Wednesday, August 19, 2009

Vellum Christmas Box

This is a great but easy box to make using the vellum cardstock. I used the White StazOn ink to stamp the Seasons of Joy image onto it (this is a permanent ink so will not smudge).

The red gingham ribbon looks so gorgeous and Christmasy. Attached to that is a gift tag using the scalloped oval punch. This is an optical illusion. I have 3 scalloped ovals all just off set so it looks like there is a larger oval behind it.

Contact me for any of your scrapbooking, cardmaking or 3D project needs and for a template of this box.
Donna

Wednesday, August 5, 2009

Mini Choc Box

This choc box is a smaller version than the one that I had on my blogsite in June. I have cased this from page 22 from the Spring mini catalogue. They have used the Soft Summer stamp set, which incidentally is my favourite set of the catalogue. As I don't own it yet, I have used the Heartfelt Thanks stamp set from the Ideas Book and Catalogue, which is a really versatile stamp set. There are over 6000 designs that use this stamp set on http://www.splitcoaststampers.com/. (Click on the link to take a look.)

Tuesday, June 23, 2009

Goodie Bag Wrap


Created by Donna Calley. Images copyright Stampin' Up! 1998-2009


This Goodie Bag Wrap is unbelievable simply and great fun to make.

1. Cut an A4 piece of cardstock lengthways, I used Bashful Blue. Your piece should measure 10.5cm by 29cm.
2. Use your Stampin' Around wheel to decorate it. I used the Classic Stars on page 120 SU! catalogue and Bashful Blue ink.
3. Using the scoring blade on your paper trimmer score half way, then score both ends at 4cm.
4. Use your bone folder to get a lovely crisp crease. Then punch out the neck of the bow with the Wide Oval Punch.
5. Overlap the two bottom 4 cm flaps using Sticky Strip to attach them.
Now all you need to do is to add your own embellishments.

Stamp sets: star roller, All In The Family
Ink: Bashful Blue, Black StazOn ink
Card Stock: Bashful Blue, Real Red, Old olive
Accessories: Blender pens, Poppin' Pastels, Real Red 1/4" grosgrain ribbon, Old olive 5/8"grosgrain ribbon, hemp twine, scalloped circle, 1 1/4" & 1 3/8" circle punhes, wide oval punch ( for the handle), medium cello bags, small and large Star punches.

Hope you have fun making this.
Donna